Windows 11, Microsoft’s latest operating system, introduced a fresh interface, enhanced security features, and improved productivity tools. Unlike Windows 10, it features a centered Start menu, redesigned taskbar, new Microsoft Store, and enhanced gaming capabilities through DirectX 12 Ultimate and Auto HDR. However, these visual improvements and new features can sometimes impact system performance, especially on older hardware.
Optimizing Windows 11 becomes crucial for users who want to maximize their computer’s potential. Whether you’re a professional working with resource-intensive applications, a gamer seeking smoother gameplay, or simply someone frustrated with slow boot times and laggy performance, proper optimization can transform your computing experience.
This guide is particularly valuable for users running Windows 11 on hardware that meets minimum requirements but isn’t cutting-edge, those experiencing performance degradation over time, and anyone wanting to squeeze every bit of performance from their system without upgrading hardware.
You can also refer to and download Windows 11 lite versions here.
Signs That Your Windows 11 System Needs Optimization
Recognizing when your Windows 11 system requires optimization is the first step toward improved performance. Here are the telltale signs that indicate your system could benefit from optimization:
- Slow Boot and Startup Times: If your computer takes more than 60 seconds to boot or programs take excessive time to launch, optimization is needed. Modern systems with SSDs should boot in 15-30 seconds.
- High CPU and RAM Usage at Idle: Task Manager showing consistently high CPU usage (above 20%) or RAM usage (above 70%) when no demanding applications are running indicates background processes consuming resources unnecessarily.
- Frequent System Freezes and Lag: Regular system freezes, delayed responses to clicks, or lag when switching between applications suggest system optimization issues.
- Slow File Operations: Copying, moving, or accessing files taking longer than expected, especially on solid-state drives, indicates potential system bottlenecks.
- Poor Gaming Performance: Frame rate drops, stuttering, or games running below expected performance levels despite meeting system requirements.
- Excessive Fan Noise: Constant fan activity even during light usage suggests the system is working harder than necessary due to inefficient resource management.
- Storage Space Issues: Rapidly diminishing disk space despite not installing new programs indicates temporary files, system cache, or other optimization issues.
How to Optimize Windows 11 (Step by Step)
Optimize Startup Programs and Services
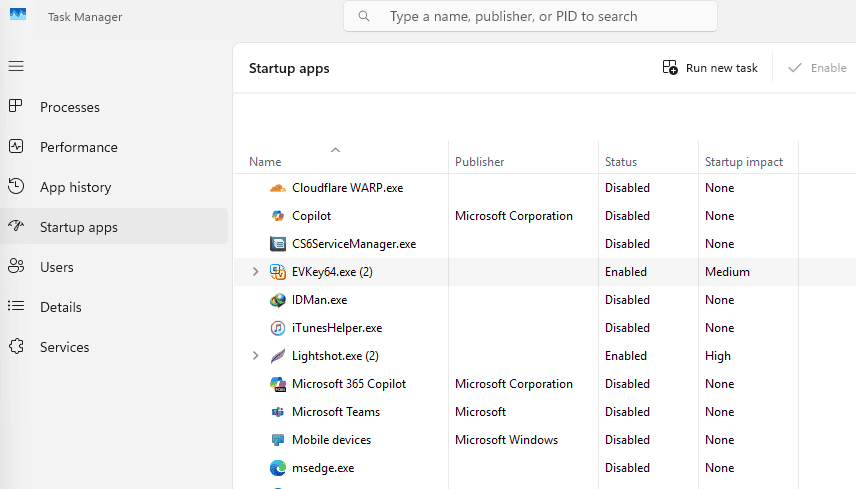
Startup optimization is one of the most impactful performance improvements you can make. Many programs automatically add themselves to startup, consuming valuable system resources.
Disable Unnecessary Startup Apps:
- Press Ctrl + Shift + Esc to open Task Manager
- Click the “Startup” tab
- Review each program’s startup impact (High, Medium, Low)
- Right-click programs you don’t need at startup and select “Disable”
- Focus on disabling programs marked as “High” impact first
Optimize System Services:
- Press Windows + R, type “services.msc” and press Enter
- Look for services you can safely disable, such as:
- Windows Search (if you don’t use search frequently)
- Print Spooler (if no printer is connected)
- Fax service (unless actively used)
- Right-click the service, select “Properties,” and change startup type to “Disabled” or “Manual”
Clean Up Your System Thoroughly
System cleanup removes unnecessary files that accumulate over time, freeing storage space and improving performance.
Use Built-in Disk Cleanup Tools:
- Open Settings > System > Storage
- Click “Storage Sense” and configure it to run automatically
- Enable “Delete temporary files that my apps aren’t using”
- Set “Delete files in my recycle bin” to 30 days
- Run Disk Cleanup by typing “cleanmgr” in the search bar
Advanced Cleanup Options:
- Clear Windows Update cache by running “wsreset.exe”
- Clean browser cache and temporary files
- Remove old Windows installation files (Windows.old folder)
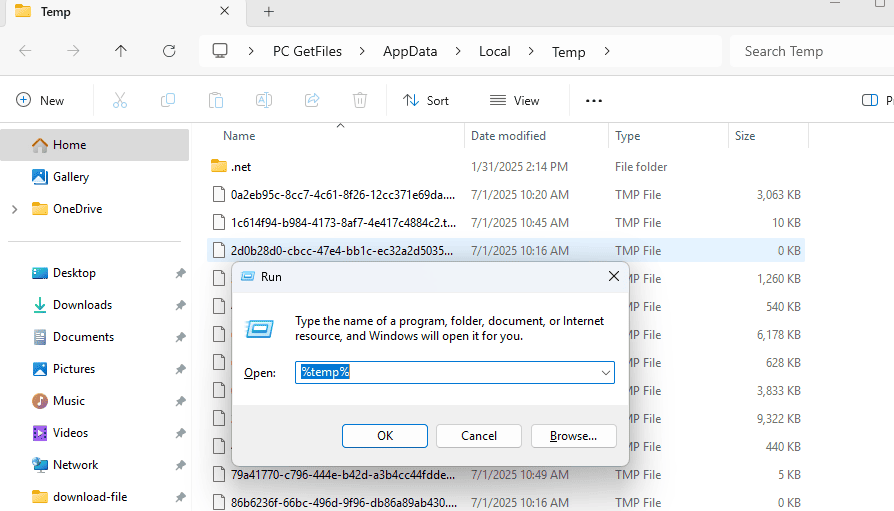
- Clear system temp folders (%temp% and C:\Windows\Temp)
Disable Unnecessary Visual Effects
Windows 11’s visual effects, while aesthetically pleasing, consume system resources that could be better utilized for performance.
Optimize Visual Performance:
- Right-click “This PC” and select “Properties”
- Click “Advanced system settings”
- Under Performance, click “Settings”
- Select “Adjust for best performance” or “Custom” to choose specific effects
- Keep only essential effects like “Show thumbnails instead of icons”

Disable Transparency Effects:
- Go to Settings > Personalization > Colors
- Turn off “Transparency effects”
- This reduces GPU usage and improves performance on integrated graphics
Improve Drive Performance
Drive optimization is crucial for maintaining fast file access and overall system responsiveness.
For Traditional Hard Drives (HDD):
- Open “This PC” and right-click your main drive
- Select “Properties” > “Tools” > “Optimize”
- Select your drive and click “Optimize” to defragment
- Schedule automatic optimization monthly
For Solid State Drives (SSD):
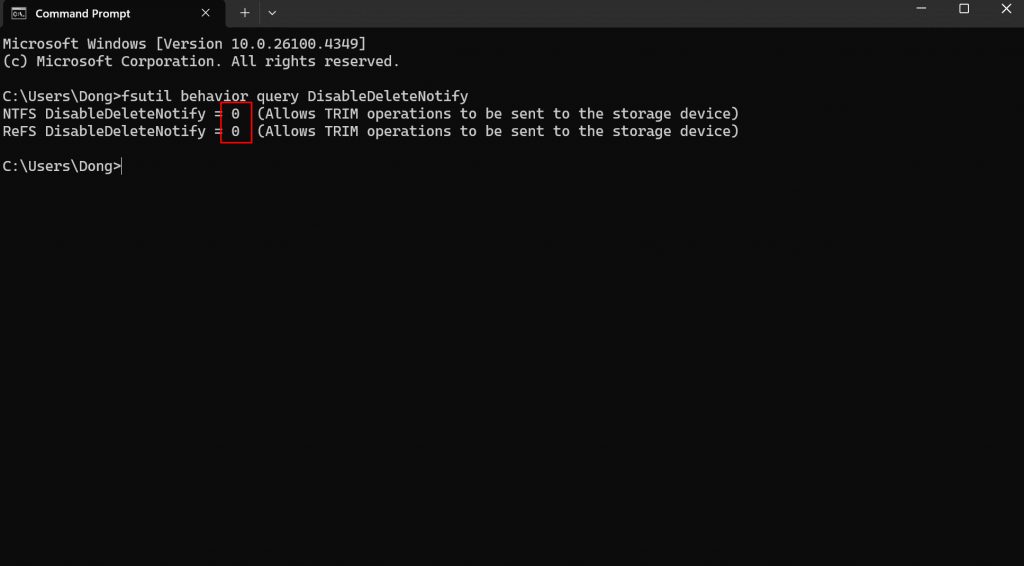
- Ensure TRIM is enabled by running “fsutil behavior query DisableDeleteNotify” in Command Prompt
- Result should be “0” – if not, run “fsutil behavior set DisableDeleteNotify 0”
- Never defragment SSDs – use optimization instead
- Check for firmware updates from your SSD manufacturer
Check for Disk Errors:
- Open Command Prompt as administrator
- Run “chkdsk C: /f /r” (replace C: with your drive letter)
- Schedule the scan for next restart if prompted
RAM Optimization Techniques
Effective memory management ensures your system runs smoothly even with limited RAM.
Adjust Virtual Memory:
- Go to System Properties > Advanced > Performance Settings
- Click “Advanced” tab > “Change” under Virtual memory
- Uncheck “Automatically manage paging file size”
- Set custom size: Initial size = 1.5x your RAM, Maximum size = 3x your RAM
- Click “Set” and restart your computer
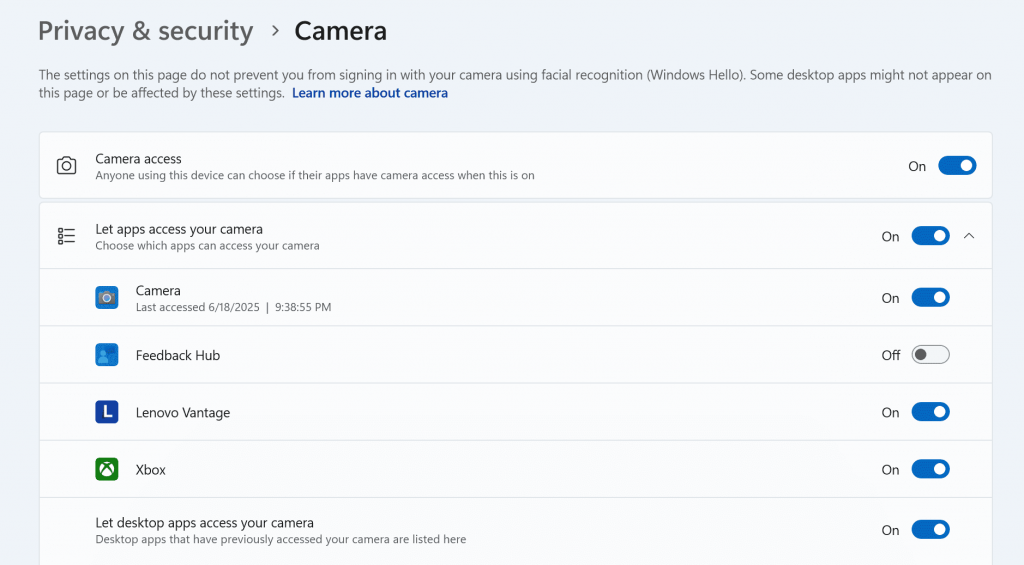
Manage Background Applications:
- Go to Settings > Privacy & security > Background apps
- Turn off background activity for apps you don’t need running constantly
- Keep essential apps like mail, calendar, and security software enabled
Remove Bloatware and Unused Applications
Pre-installed software and unused applications consume storage space and system resources.
Uninstall Unnecessary Programs:
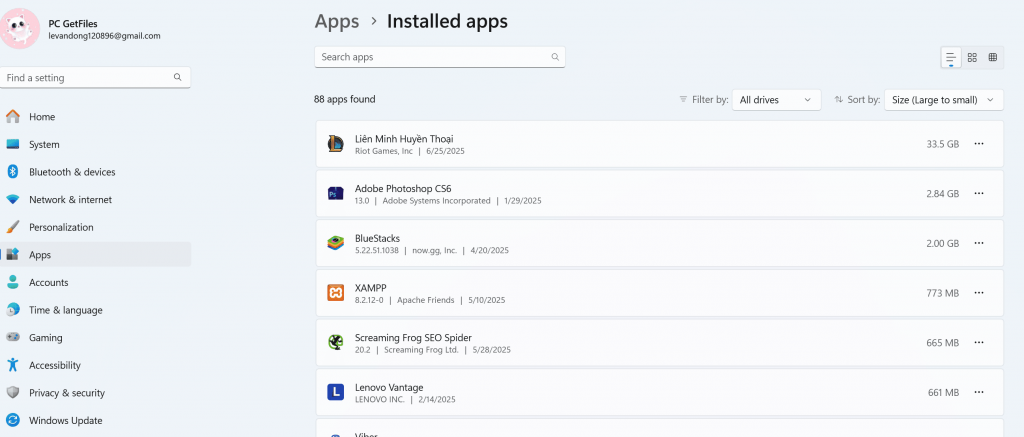
- Go to Settings > Apps > Installed apps
- Sort by “Size” to identify large, unused applications
- Click the three dots next to unwanted apps and select “Uninstall”
- Use PowerShell to remove built-in apps you don’t need
Safe Bloatware Removal:
- Xbox apps (if you don’t game)
- 3D Viewer and Paint 3D
- Mixed Reality Portal
- Cortana (can be disabled, not fully removed)
Update Drivers and Windows Properly
Keeping drivers and Windows updated ensures optimal performance and security.
Update Device Drivers:
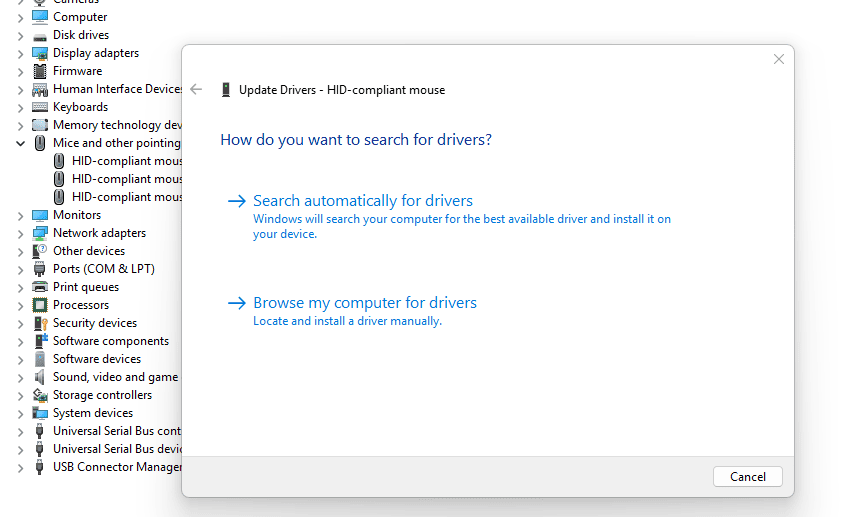
- Right-click Start button and select “Device Manager”
- Look for devices with yellow warning triangles
- Right-click problematic devices and select “Update driver”
- Use manufacturer websites for the latest graphics and chipset drivers
Windows Update Optimization:
- Go to Settings > Windows Update
- Click “Advanced options” and configure active hours
- Enable “Download updates over metered connections” if needed
- Restart promptly after updates to complete installation
Game Mode and Gaming Optimization
Windows 11 includes several gaming-focused optimizations that benefit overall system performance.
Enable Game Mode:
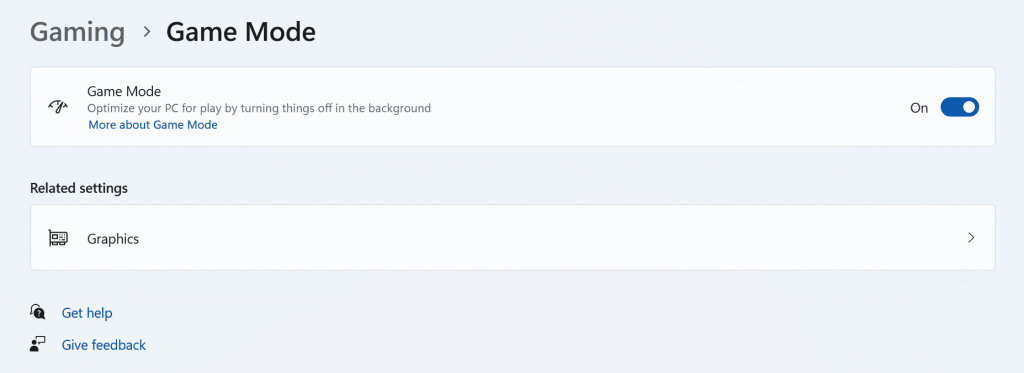
- Go to Settings > Gaming > Game Mode
- Turn on Game Mode to prioritize system resources for better performance
- This setting also benefits non-gaming applications by reducing background interruptions
Graphics Performance Settings:
- Go to Settings > System > Display > Graphics
- Add applications that need high performance
- Set them to “High performance” to use dedicated GPU when available
Adjust Power Plan Settings
Power settings significantly impact system performance, especially on laptops.
Optimize Power Plans:
- Search for “Power Options” in the Start menu
- Select “High performance” or “Balanced” instead of “Power saver”
- Click “Change plan settings” and set both options to “Never” for maximum performance
- For advanced users, access “Change advanced power settings” for fine-tuning
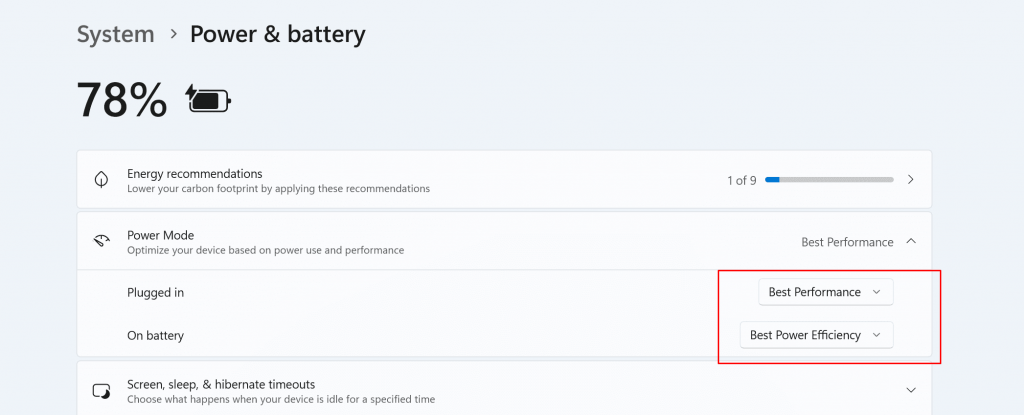
Processor Power Management:
- In advanced power settings, expand “Processor power management”
- Set “Minimum processor state” to 5% and “Maximum processor state” to 100%
- This allows your CPU to scale performance based on demand
Registry Tweaks (Advanced Users Only)
Registry modifications can provide additional performance benefits but require caution and technical knowledge.
⚠️ Important Warning: Always create a system backup and registry backup before making any registry changes. Incorrect modifications can render your system unstable or unusable.
Safe Registry Optimizations:
- Press Windows + R, type “regedit” and press Enter
- Navigate to HKEY_LOCAL_MACHINE\SOFTWARE\Microsoft\Windows\CurrentVersion\Explorer
- Create a new DWORD value named “Max Cached Icons” and set it to 8192
- This increases icon cache size for better visual performance
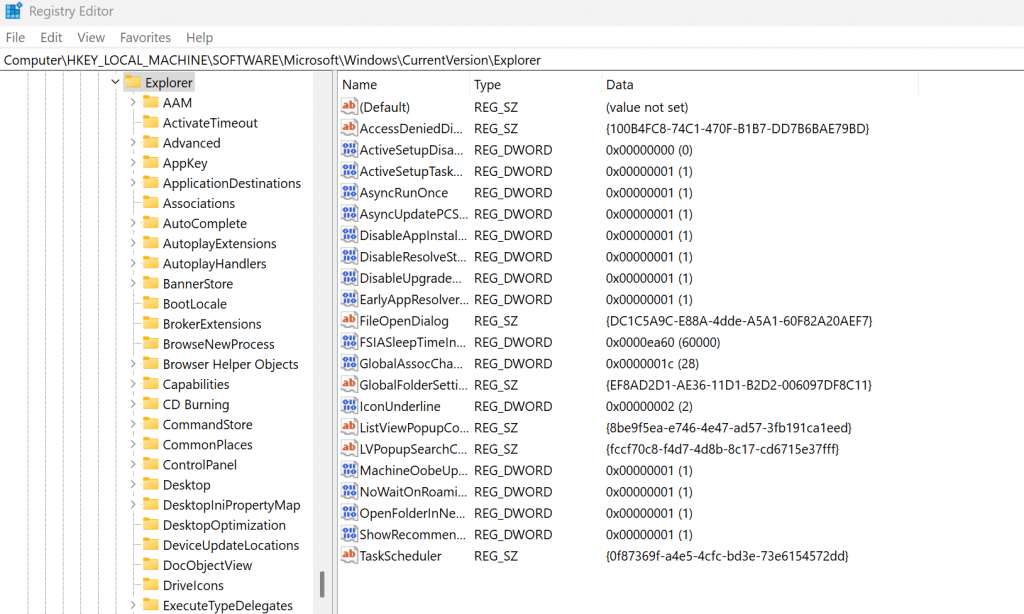
Menu Delay Reduction:
- Navigate to HKEY_CURRENT_USER\Control Panel\Desktop
- Find “MenuShowDelay” and change its value to 0 for instant menu appearance
Recommended Tools for Windows 11 Optimization
While Windows 11 includes many built-in optimization tools, third-party applications can provide additional functionality and convenience.
- CCleaner (Free Version): A reliable system cleaner that removes temporary files, registry entries, and browser data. The free version provides essential cleaning features without the advanced monitoring of the paid version.
- Autoruns by Microsoft Sysinternals: This powerful tool shows all programs that start automatically with Windows, including services, drivers, and scheduled tasks. It provides more detailed control than the built-in Task Manager startup tab.
- Windows 11 Debloater (PowerShell Script): An open-source script that safely removes Windows bloatware and disables unnecessary features. It’s particularly useful for users who want a cleaner Windows installation.
- CrystalDiskInfo: Essential for monitoring drive health, especially for SSDs. It provides detailed information about your storage devices and alerts you to potential issues before they cause problems.
- MSI Afterburner: While primarily a GPU overclocking tool, it includes excellent system monitoring capabilities that help identify performance bottlenecks during optimization.
Common Mistakes to Avoid
Optimization efforts can sometimes do more harm than good if not approached carefully. Here are critical mistakes to avoid:
- Deleting Critical System Files: Never delete files from Windows, Program Files, or System32 folders unless you’re absolutely certain of their purpose. These files are essential for system stability.
- Disabling Essential Services: Some Windows services are critical for system operation. Research any service before disabling it, and avoid disabling services related to security, networking, or core Windows functionality.
- Using Aggressive “System Cleaners”: Avoid tools that promise dramatic performance improvements through aggressive registry cleaning or system modifications. These often cause more problems than they solve.
- Over-Optimizing Startup: While reducing startup programs improves boot time, disabling everything can eliminate useful functionality. Keep essential programs like antivirus software and important system utilities.
- Ignoring Driver Updates: Outdated drivers can cause performance issues and system instability. However, avoid beta or experimental drivers unless you’re experiencing specific issues they address.
- Modifying Registry Without Backup: Registry changes can have far-reaching consequences. Always create a backup point before making modifications, and understand what each change accomplishes.
Expert Tips and Best Practices
Drawing from years of Windows optimization experience, these best practices ensure safe and effective performance improvements:
- Create System Restore Points: Before making any significant changes, create a restore point. Go to “Create a restore point” in the Start menu and click “Create” to establish a recovery baseline.
- Implement Changes Gradually: Don’t apply all optimizations at once. Make one or two changes, restart your system, and evaluate the impact before proceeding. This approach helps identify which changes provide the most benefit and makes troubleshooting easier if issues arise.
- Monitor System Performance: Use built-in Performance Monitor or third-party tools to track CPU usage, memory consumption, and disk activity. This data helps you understand which optimizations provide real benefits versus placebo effects.
- Maintain Regular Optimization Schedule: Perform light optimizations monthly, including disk cleanup, startup program review, and driver updates. Quarterly, conduct more thorough optimizations like registry cleaning and deep system scans.
- Keep System Documentation: Maintain a log of changes you’ve made, especially registry modifications and service adjustments. This documentation proves invaluable when troubleshooting issues or needing to reverse changes.
- Test System Stability: After optimization, run your computer through typical usage scenarios and stress tests to ensure stability. Use Windows Memory Diagnostic and built-in troubleshooters to verify system health.
- Prioritize Security: Never compromise system security for performance gains. Keep Windows Defender or your chosen antivirus active, maintain firewall protection, and ensure automatic security updates remain enabled.
Conclusion
Optimizing Windows 11 for maximum performance is a rewarding process that can dramatically improve your computing experience without requiring hardware upgrades. The techniques outlined in this guide, from basic startup optimization to advanced registry tweaks, provide a comprehensive approach to system enhancement.
The key to successful optimization lies in methodical implementation, starting with safe, high-impact changes like startup program management and visual effects adjustment. As you become more comfortable with the process, you can explore advanced techniques while always maintaining system backups and stability as priorities.
Remember that optimization is an ongoing process, not a one-time fix. Regular maintenance using these techniques will keep your Windows 11 system running at peak performance. Start with the easiest optimizations today, and gradually implement more advanced techniques as your confidence and expertise grow.
Your optimized Windows 11 system will reward you with faster boot times, improved responsiveness, and better overall performance, making every computing task more efficient and enjoyable.
Frequently Asked Questions
Is it safe to use third-party optimization tools for Windows 11?
Third-party optimization tools can be safe when chosen carefully. Stick to reputable tools like CCleaner, Autoruns, and other well-established utilities. Avoid aggressive “system cleaners” that promise unrealistic performance gains. Always research tools before using them and create system backups before running any optimization software.
Should I defragment an SSD?
No, never defragment SSDs. Solid-state drives don’t benefit from defragmentation and the process can actually reduce their lifespan by creating unnecessary write operations. Instead, ensure TRIM is enabled and use Windows’ built-in SSD optimization feature, which performs maintenance specific to solid-state storage technology.
Can too much optimization break my system?
Yes, over-optimization can cause system instability or functionality loss. This typically happens when users disable critical services, delete system files, or make aggressive registry changes without understanding their impact. The key is implementing changes gradually, maintaining backups, and researching each modification before applying it.
How often should I optimize my Windows 11 system?
Perform basic optimizations (disk cleanup, startup review) monthly. More comprehensive optimizations, including driver updates and registry maintenance, should be done quarterly. However, if you notice performance degradation, don’t wait for your scheduled maintenance – address issues as they arise.
Will optimization void my computer warranty?
Software optimizations typically don’t void warranties, as they don’t modify hardware or firmware. However, some manufacturers may void support for software issues if they detect system modifications. Always check your warranty terms, and consider that warranty support often requires restoring default settings anyway.

