Installing Windows 11 is just the beginning of your journey with Microsoft’s latest operating system. What you do in the first few hours after installation can dramatically impact your system’s performance, security, and overall user experience for months to come.
As someone who has set up hundreds of Windows 11 systems across different hardware configurations, I’ve learned that the post-installation phase is where most users either set themselves up for success or unknowingly create problems down the road. This comprehensive guide is designed for everyone—from first-time Windows users to seasoned PC enthusiasts who want to ensure they’re not missing crucial optimization steps.
The difference between a properly configured Windows 11 system and one that’s left with default settings is like night and day. A well-optimized setup can mean faster boot times, better battery life, enhanced security, improved privacy, and a more personalized computing experience that actually works the way you need it to.
Why Post-Installation Setup Matters
Performance and Stability
A fresh Windows 11 installation comes with default settings that prioritize broad compatibility over optimal performance. Many background processes, visual effects, and unnecessary applications consume system resources from day one. Proper post-installation setup can improve system responsiveness by 20-30% and significantly reduce boot times.
Security and Privacy
Windows 11’s default privacy settings are designed more for Microsoft’s data collection needs than user privacy. Without proper configuration, your system may be sharing diagnostic data, location information, and usage patterns. Additionally, Windows Defender needs proper configuration to provide maximum protection.
Personalization and Productivity
The default Windows 11 interface may not align with your workflow or preferences. Customizing the Start menu, taskbar, notification settings, and productivity features can save hours of frustration and significantly improve your daily computing experience.
Avoiding Common Pitfalls
Many users skip essential setup steps, leading to problems like outdated drivers causing crashes, bloatware consuming resources, or missing important security updates. Addressing these issues proactively prevents bigger problems later.
Essential Things to Do After Installing Windows 11
1. Check for Windows Updates
Why This Matters: Windows updates contain critical security patches, bug fixes, and feature improvements. A fresh installation may be missing months of important updates.
Step-by-Step Process:
- Press
Windows + Ito open Settings - Navigate to “Windows Update” in the left sidebar
- Click “Check for updates”
- Install all available updates, including optional ones
- Restart when prompted
- Repeat the process until no more updates are available

Expert Tip: Don’t just check once. Sometimes updates unlock additional updates. I typically run this process 2-3 times on a fresh installation to ensure everything is current.
Timeline: Allow 30-60 minutes for this process, depending on your internet speed and the number of available updates.
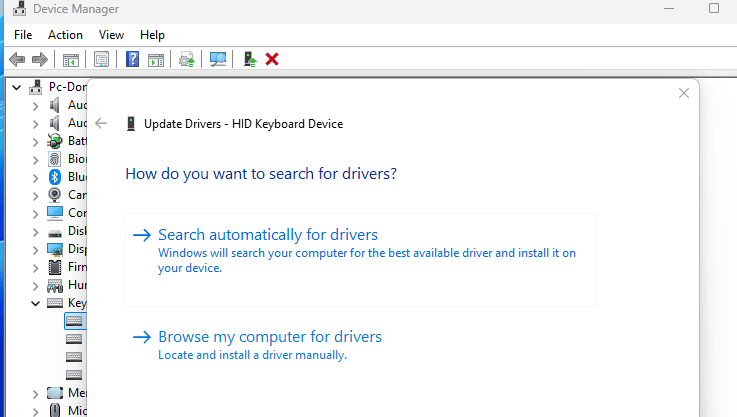
2. Install the Latest Drivers
Why This Matters: Generic drivers provided by Windows may not unlock your hardware’s full potential. Updated drivers improve performance, stability, and feature access.
Priority Driver Installation Order:
- Graphics Drivers (NVIDIA, AMD, or Intel)
- Download directly from manufacturer websites
- Use GeForce Experience for NVIDIA or AMD Software for AMD cards
- Chipset Drivers
- Essential for motherboard functionality
- Available from motherboard manufacturer or CPU vendor
- Network Drivers
- Ethernet and Wi-Fi adapters
- Critical for stable internet connectivity
- Audio Drivers
- Often improves sound quality and unlocks advanced features
Best Practices:
- Always download drivers from official manufacturer websites
- Avoid driver update utilities that promise to “scan and fix” drivers
- Create a restore point before installing major driver updates
- For laptops, check the manufacturer’s support page for system-specific driver packages
3. Activate Windows & Sign in with Microsoft Account
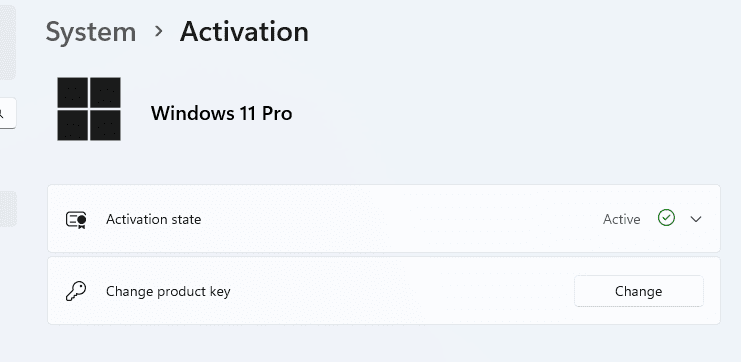
Windows Activation: If Windows isn’t automatically activated, you’ll need to enter your product key:
- Go to Settings > System > Activation
- Click “Change product key”
- Enter your 25-character product key
- Follow the activation process
Microsoft Account Considerations: While you can use Windows 11 with a local account, a Microsoft Account provides several benefits:
- Automatic settings sync across devices
- Access to Microsoft Store and services
- Enhanced security features like Windows Hello
- OneDrive integration
Privacy-Conscious Alternative: If you prefer maximum privacy, create a local account after installation and manually configure only the Microsoft services you actually need.
4. Uninstall Unnecessary Pre-installed Apps (Bloatware)
Why Remove Bloatware: Pre-installed applications consume storage space, use system resources, and may pose security risks if not regularly updated.
Safe-to-Remove Applications:
- Candy Crush Saga and other games
- TikTok, Instagram, Facebook apps
- Trial versions of antivirus software
- Manufacturer-specific utilities you don’t need
- Xbox Game Bar (if you’re not a gamer)
Removal Methods:
Method 1: Through Settings
- Open Settings > Apps > Installed apps
- Find the unwanted application
- Click the three-dot menu and select “Uninstall”
Method 2: PowerShell for Stubborn Apps For apps that don’t uninstall normally:
- Right-click Start button and select “Windows Terminal (Admin)”
- Use commands like
Get-AppxPackage *appname* | Remove-AppxPackage
Caution: Never remove system-critical applications like Windows Security, Microsoft Store, or core Windows components.
5. Install Essential Software
Must-Have Applications for Most Users:
Web Browser:
- Chrome, Firefox, or Edge (if not using the default)
- Configure with your preferred security and privacy settings
Productivity Suite:
- Microsoft Office or LibreOffice
- Adobe Acrobat Reader or alternative PDF viewer
- Note-taking app like Notion, Obsidian, or OneNote
Media and Communication:
- VLC Media Player for video files
- Image viewer like IrfanView or Windows Photos
- Communication tools (Zoom, Teams, Discord)
Utilities:
- 7-Zip for file compression
- Malwarebytes for additional security scanning
- CPU-Z or HWiNFO for system information
Installation Best Practices:
- Download software only from official websites
- Decline additional software offers during installation
- Choose custom installation to avoid unwanted browser toolbars or homepage changes
6. Customize Privacy Settings
Critical Privacy Configurations:
Diagnostic Data:
- Settings > Privacy & security > Diagnostics & feedback
- Set diagnostic data to “Required diagnostic data” (minimum)
- Turn off “Improve inking and typing recognition”
- Disable “Tailored experiences”
Activity History:
- Settings > Privacy & security > Activity history
- Turn off “Store my activity history on this device”
- Clear existing activity history
Location Services:
- Settings > Privacy & security > Location
- Turn off location service if not needed
- Review and disable location access for individual apps
Camera and Microphone:
- Review which apps have access to camera and microphone
- Disable access for apps that don’t require these features
App Permissions: Systematically review permissions for:
- Contacts, calendar, call history
- Email, messaging, radios
- Background apps
7. Adjust Windows Settings
Display Optimization:
- Right-click desktop > Display settings
- Verify correct resolution and scaling
- Configure multiple monitors if applicable
- Adjust night light settings for eye comfort
Default Apps Configuration:
- Settings > Apps > Default apps
- Set preferred applications for:
- Web browser
- Email client
- Music and video players
- Photo viewer
- PDF reader
Power Plan Optimization:
- Control Panel > Power Options
- Select “High performance” for desktop PCs
- For laptops, customize “Balanced” plan:
- Adjust screen brightness timeout
- Configure sleep settings
- Optimize processor power management
8. Optimize Startup Programs
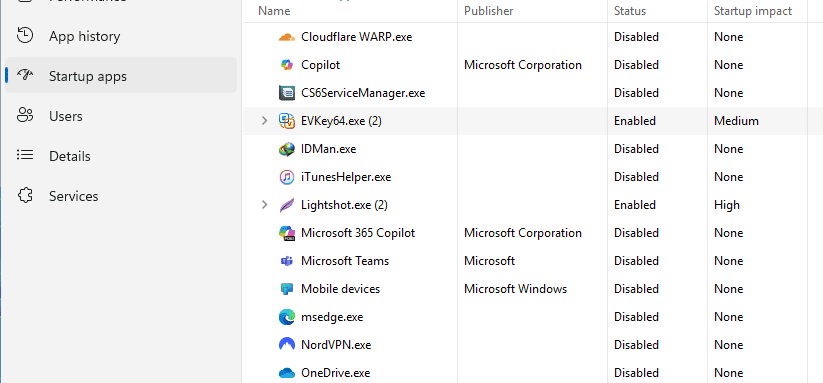
Why This Matters: Too many startup programs significantly slow boot times and consume system resources.
Managing Startup Programs:
- Press
Ctrl + Shift + Escto open Task Manager - Click the “Startup” tab
- Review each program’s startup impact
- Right-click and disable programs you don’t need immediately at startup
Programs Safe to Disable:
- Spotify, Steam, Discord (unless you use them immediately)
- Adobe updaters
- Manufacturer bloatware utilities
- Office applications (they start quickly when needed)
Programs to Keep Enabled:
- Windows Security
- Audio drivers
- Graphics card utilities
- VPN software (if used regularly)
9. Set Up OneDrive or Cloud Backups
OneDrive Configuration:
- Sign in to OneDrive with your Microsoft account
- Choose which folders to sync (avoid syncing everything initially)
- Configure backup for Desktop, Documents, and Pictures folders
- Set up selective sync to save local storage space
Alternative Cloud Solutions:
- Google Drive for Google ecosystem users
- Dropbox for cross-platform compatibility
- iCloud for Apple ecosystem integration
Best Practices:
- Don’t sync large media libraries initially
- Use “Files On-Demand” to save local storage
- Regularly review what’s being synced
- Consider separate backup solutions for critical data
10. Create a System Restore Point or Full Backup
Creating a Restore Point:
- Type “Create a restore point” in Start menu
- Click “Create” button
- Name it “Fresh Windows 11 Installation”
- Wait for completion
Enable System Restore (if disabled):
- System Properties > System Protection
- Select your C: drive
- Click “Configure”
- Enable system protection and allocate 5-10% disk space
Full System Backup: For complete protection, create a full system image:
- Control Panel > Backup and Restore (Windows 7)
- Click “Create a system image”
- Choose backup location (external drive recommended)
- Follow the wizard to create complete system backup
11. Configure Windows Security
Windows Defender Optimization:
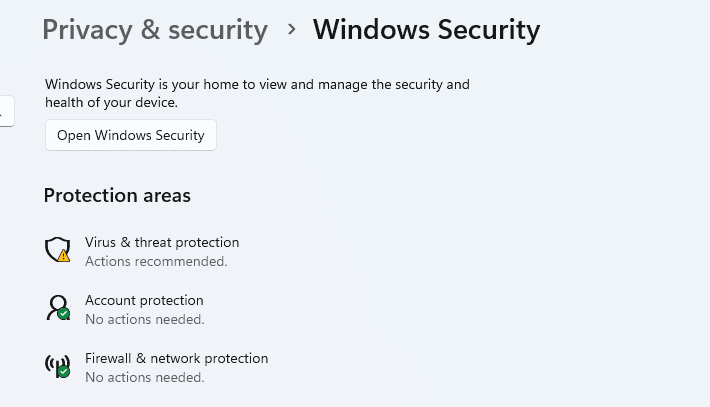
- Open Windows Security from Start menu
- Virus & threat protection settings:
- Enable Cloud-delivered protection
- Turn on Automatic sample submission
- Enable Controlled folder access (protects against ransomware)
Firewall Configuration:
- Windows Security > Firewall & network protection
- Ensure firewall is enabled for all network types
- Review allowed apps through firewall
Browser Security:
- Enable SmartScreen for Microsoft Edge
- Configure secure DNS (Cloudflare: 1.1.1.1 or Quad9: 9.9.9.9)
12. Customize Start Menu & Taskbar
Start Menu Optimization:
- Right-click Start button > Settings
- Personalization > Start
- Configure:
- Show recently added apps
- Show most used apps
- Show recently opened items
- Remove or add pinned applications
- Organize apps in logical groups
Taskbar Customization:
- Right-click taskbar > Taskbar settings
- Configure:
- Taskbar alignment (centered or left)
- Hide/show search, task view, widgets
- System tray icon management
- Pin frequently used applications
13. Enable/Disable Key Features
Snap Layouts:
- Enable for improved window management
- Customize snap zones in Settings > System > Multitasking
Widgets:
- Disable if not used to free up resources
- Settings > Personalization > Taskbar > Widgets
Game Mode:
- Enable for gaming PCs: Settings > Gaming > Game Mode
- Optimizes system resources for gaming
Focus Assist:
- Configure for work productivity
- Settings > System > Focus assist
- Set up automatic rules for focused work times
14. Adjust Update Settings
Prevent Forced Restarts:
- Settings > Windows Update > Advanced options
- Set active hours to prevent automatic restarts
- Configure restart options for convenience
Pause Updates:
- Use pause feature for important deadlines
- Maximum 5 weeks for Windows 11 Home
- Longer pause periods available for Pro versions
Delivery Optimization:
- Windows Update > Advanced options > Delivery Optimization
- Consider disabling downloads from other PCs if bandwidth is limited
15. Sync Settings and Enable Productivity Features
Clipboard History:
- Settings > System > Clipboard
- Enable clipboard history
- Use
Windows + Vto access clipboard history - Pin frequently used items
Nearby Share:
- Enable for easy file sharing with nearby devices
- Settings > System > Nearby sharing
Phone Link:
- Connect Android or iPhone for notifications and messaging
- Particularly useful for Android users
Specialized Tips by User Type
For Gamers
Essential Gaming Optimizations:
- Enable Game Mode in Settings > Gaming
- Turn on Auto HDR for compatible games
- Install Xbox app for Game Pass integration
- Configure GPU-specific software (GeForce Experience, AMD Software)
- Disable fullscreen optimizations for competitive games
- Set high-performance power plan
- Update DirectX and Visual C++ redistributables
For Work Users
Productivity Enhancements:
- Set up Virtual Desktops for task separation
- Configure Focus Assist for meeting times
- Install Microsoft PowerToys for advanced utilities
- Set up VPN connections if required
- Configure enterprise security features
- Enable BitLocker encryption for sensitive data
Bonus Optimization Tips
Storage Sense Configuration
Automated Cleanup:
- Settings > System > Storage > Storage Sense
- Enable automatic cleanup
- Configure cleanup frequency
- Set rules for temporary files and Recycle Bin
Visual Effects Optimization
For Better Performance:
- Control Panel > System > Advanced system settings
- Performance Settings > “Adjust for best performance”
- Or choose “Custom” and enable only essential visual effects
Network Optimization
DNS Configuration:
- Network settings > Change adapter options
- Right-click your connection > Properties
- Select Internet Protocol Version 4
- Use custom DNS servers (1.1.1.1, 8.8.8.8)
Registry and System Maintenance
Disk Cleanup:
- Run Disk Cleanup utility monthly
- Clean system files and temporary data
- Use built-in tools rather than third-party cleaners
Common Mistakes to Avoid
1. Ignoring Driver Updates
Many users rely solely on Windows Update for drivers, missing manufacturer-specific optimizations and features.
2. Keeping Default Privacy Settings
Windows 11’s default settings prioritize Microsoft’s data collection over user privacy.
3. Not Creating Backups
Failing to create restore points or backups before making system changes can lead to irreversible problems.
4. Installing Too Many Startup Programs
Every additional startup program increases boot time and reduces available system resources.
5. Disabling Windows Security
Some users disable Windows Defender without installing adequate alternative protection.
6. Ignoring System Maintenance
Systems require regular maintenance like disk cleanup, update installation, and performance monitoring.
Expert Recommendations
Monthly Maintenance Checklist
First Week of Each Month:
- Check for and install Windows updates
- Update drivers from manufacturer websites
- Run full antivirus scan
- Clean temporary files and browser cache
- Review startup programs and disable unnecessary ones
Quarterly Tasks:
- Create new system restore point
- Review and update installed software
- Clean registry using built-in tools
- Check hard drive health
- Review privacy settings for new features
Balance Performance and Usability
Don’t sacrifice essential features for marginal performance gains. Focus on changes that provide meaningful improvements to your daily workflow.
Stay Informed
Windows 11 receives regular feature updates. Stay informed about new capabilities and security features through official Microsoft channels.
Frequently Asked Questions
Is it necessary to install drivers manually on Windows 11?
While Windows 11 automatically installs basic drivers, manual installation of manufacturer-specific drivers often provides better performance, additional features, and improved stability. This is especially important for graphics cards, motherboard chipsets, and specialized hardware.
What settings should I disable for better privacy?
Focus on disabling diagnostic data collection, activity history tracking, location services for unnecessary apps, and targeted advertising. However, some features like Windows Update and basic security telemetry should remain enabled for optimal system security.
Do I need third-party antivirus with Windows 11?
Windows Defender (now called Microsoft Defender) provides excellent protection for most users. Additional security software may be beneficial for high-risk users or business environments, but it’s not strictly necessary for typical home users.
Can I skip creating a Microsoft account?
Yes, you can use Windows 11 with a local account, but you’ll lose access to Microsoft Store apps, OneDrive integration, settings sync, and some security features. Consider the trade-offs based on your privacy preferences and feature needs.
Is it safe to remove pre-installed apps?
Most pre-installed apps can be safely removed, but avoid uninstalling core Windows components, Microsoft Store, Windows Security, or system utilities. When in doubt, disable rather than uninstall applications.
Conclusion
Properly configuring Windows 11 after installation is an investment in your future computing experience. The hour or two you spend following this guide will pay dividends in improved performance, enhanced security, better privacy, and a more personalized system that works the way you need it to.
Remember that Windows 11 setup isn’t a one-time task. As you use your system and Microsoft releases updates, you’ll want to revisit these settings periodically. The key is creating a foundation that serves your specific needs while maintaining the flexibility to adapt as those needs change.
Take your time with each step in this guide. It’s better to properly configure each setting than to rush through the process and miss important optimizations. Your future self will thank you for the effort you put in today.
Start with the essential steps outlined in this guide, then gradually explore the advanced options as you become more comfortable with your Windows 11 system. With proper setup and maintenance, Windows 11 can provide years of reliable, efficient, and enjoyable computing.

